LaTeX Basics
Introduction
LaTeX is a typesetting system that allows you to focus on your content instead of formatting - formatting is done separately from entry.
You tell LaTeX “what it is” not “how it looks.”
LaTeX using Overleaf
Create documents via a cloud based account
Source code or rich text format
Collaborating and sharing documents
Versioning and track changes
Templates for a variety of documents and publishers
Link with other tools in your research workflow
Pro account with your berkeley.edu address
Example
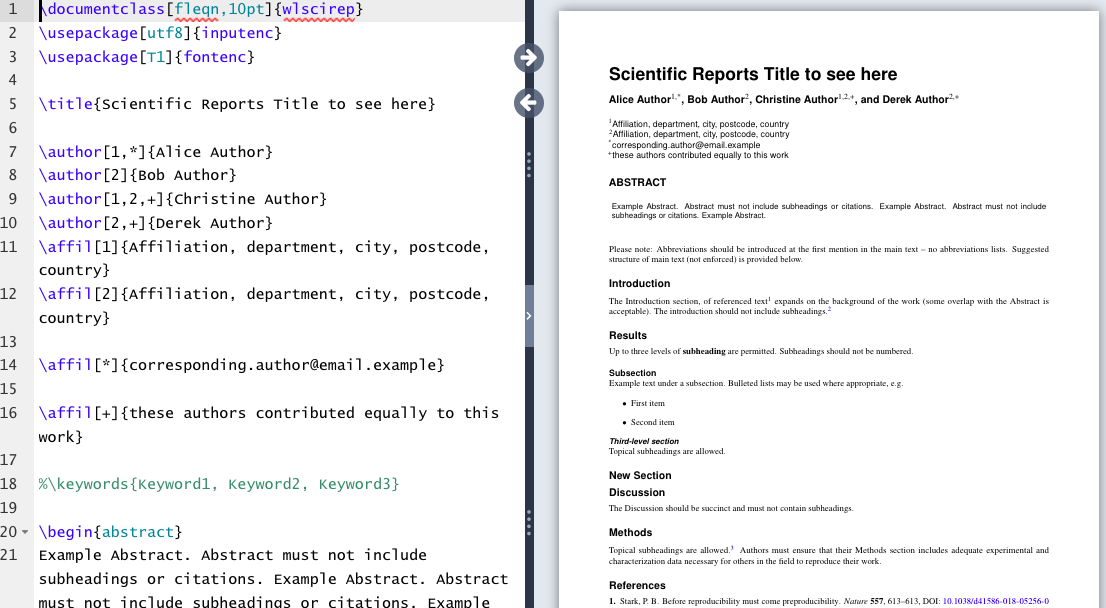
Look at the template below to get a sense of how Overleaf works. On the left side, the content is written in LaTeX. On the right side, the rendered document.
Structure of a document
| Term | Description | Example |
|---|---|---|
| Command | Control sequence which performs an action | \newpage |
| Preamble | Block of commands that define the type of document you are writing, the language you are writing in, the packages you would like to use. Comes before \begin{document} | \documentclass{article} |
| Package | Enable you to create bibliographies, insert images and figures, and write formulas. | \usepackage{amsmath} |
| Environment | Block of code with specific behavior depending on its type | \begin{} & \end{} |
| Body | Content of document enclosed inside an environment | \begin{document} |
Basic Commands
Bold:
\textbf{example}Italics:
\textit{example}Underline:
\underline{example}
Font typefaces:
Change font designations in preamble. More information:
https://
Make Title
The simplest option for making a title is to use the \maketitle command which draws from the following declarations within the preamble:
\author\date\thanks\title
Basic Math
To display math inline with text, place formula or symbol in between $:
$x + y = z$ renders inline:
Display mode \[ x + y = z \] or $$ x + y = z $$ will center the equation on its own line:
Lists
Use the \begin{itemize}...\end{itemize} environment to create unnumbered lists.
panels - Unknown Directive
panels - Unknown Directive```
\begin{itemize}
\item Apples
\item Cherries
\item Oranges
\item Peaches
\item Watermelon
\end{itemize}
```
---
This code results in:
- Apples
- Cherries
- Oranges
- Peaches
- WatermelonUse the similar \begin{enumerate}...\end{enumerate} environment to create numbered lists.
Exercise
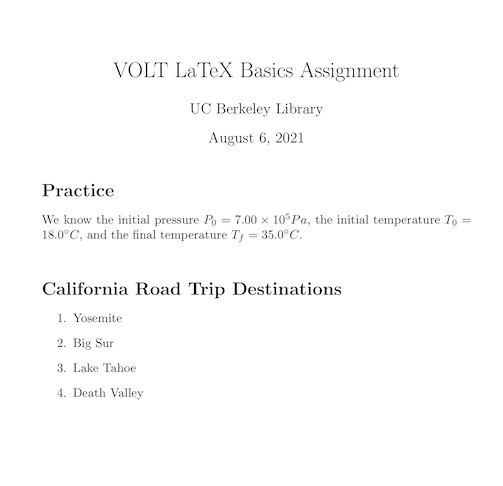
Exercise 1: Basic LaTeX Commands
Objective: Practice several basic LaTeX commands in a new project.
Open a new project in Overleaf.
Create Title
After
\title, add “VOLT LaTeX Basics Assignment”After
\author, add your nameConfirm that the date is correct or edit if needed
Display Title using command
\maketitleinserted after\begin{document}
Add a new section labeled “Practice” using the
\section*command.Add the following paragraph under that section using “inline” math commands:
We know the initial pressure , the initial temperature , and the final temperature .
Add a new section labeled “California Road Trip Destinations”
Make a numbered list of four items, for example:
Yosemite
Big Sur
Lake Tahoe
Death Valley
Results
This is how your rendered exercise should appear in Overleaf.
Mathematics and Equations
Simple Operators, Subscripts, Superscripts & More
To render simple equations, you also need to know syntax and commands for operators, relations, subscripts, superscripts, and fractions.
Operators & Relations:
+, -, =, >, < work as expected. Here are some other commands:
| Command | Display | Command | Display |
|---|---|---|---|
\times | \cdot | ||
\div | \pm | ± | |
\geq | \leq | ||
\neq | \approx |
Subscript: use the underscore (_) / Superscript: use the carret (^)
Example: $x^n+1$ gives but $x^{n+1}$ gives
Fractions:
To display a fraction, use the command \frac followed by the numerator and denominator in curly brackets.
Example: \frac{1}{x} gives
Next Steps: Greek Letters, Integrals & More
Greek Letters
Many equations and formulas use Greek letters. The command is simple - just the backslash and the name of the letter. Capitalize the command to get the capital letter. Here are some examples:
| Command | Display | Command | Display | Command | Display |
|---|---|---|---|---|---|
\alpha | \lambda | \rho | |||
\beta | \Lambda | \sigma | |||
\Gamma | \mu | \Phi | |||
\delta | \pi | \omega | |||
\Delta | \Omega |
Greek letters that are the same in English are an exception, for example, use A for Alpha, B for Beta, Z for Zeta. For more commands, see the Overleaf list of Greek letters.
Limits & Integrals
There are also commands for common operations that take upper and lower bounds:
More Advanced: Math Packages
amsmath & amssymb Packages
LaTeX has many packages that you can use to extend its capabilities. The amsmath and amssymb packages provide you with additional symbols and commands for structuring equations.
To include them, add these commands to the preamble of your LaTeX document:
\usepackage{amsmath}
\usepackage{amssymb}
amsmath: Equations Environment
Use the \begin{equation}...\end{equation} command to include a numbered equation in display mode.
\begin{equation}
\frac{\partial Q}{\partial t} = \frac{\partial s}{\partial t}
\end{equation}
results in
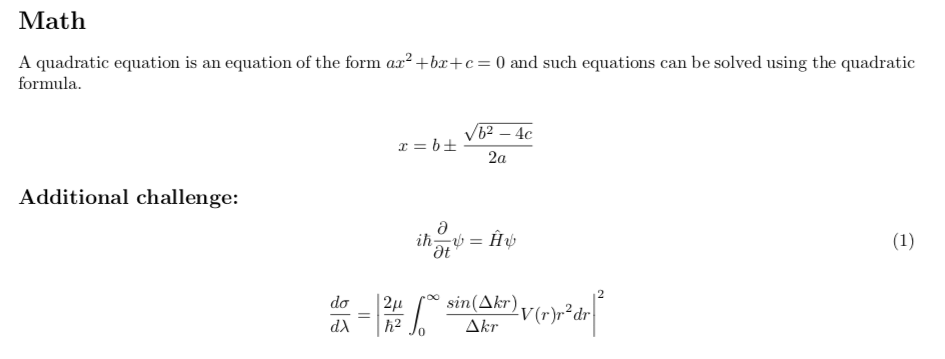
Exercise
Exercise 2: Mathematical Equations
Objective: Experiment with mathematical notations in LaTeX.
Recreate this text in your document: A quadratic equation is an equation of the form and such equations can be solved using the quadratic formula:
Additional challenges
Results
This is how your rendered exercise should appear in Overleaf.
Creating Bibliographies in LaTeX
Objective: Learn the basic commands to create and edit in-text citations and bibliographies
Getting started with a .bib file
In order to include in-text citations and a bibliography, the document needs to refer to a .bib file.
There are three ways to include a .bib file in a project in Overleaf.
Upload your own .bib file that you create or export from a citation manager.
Link to a URL (.bib)
Connect your Overleaf account with Mendeley or Zotero.
If you are working in a traditional LaTeX editor, locate the .bib file in the directory.
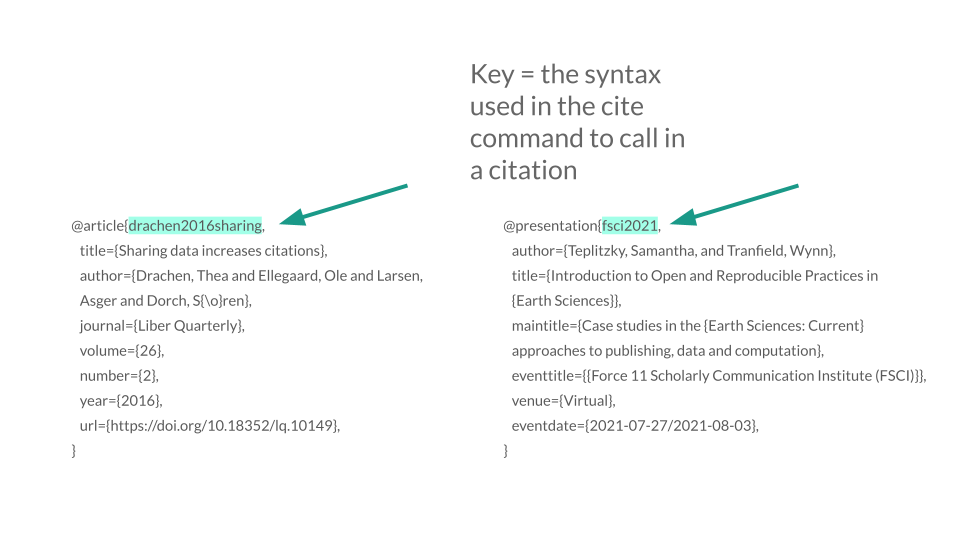
What does a citation in a .bib file look like?
Bibliography Packages
We will use the biblatex package to generate in-text citations and bibliographies. Biblatex is a flexible package for generating citations.
When adding a bibligraphy, you will need to add commands to the preamble.
Commands required for the preamble:
\usepackage[backend=biber,style=apa]{biblatex}
The above syntax calls in the biblatex package and the backend (biber), which acts as the interface between the .bib file and the LaTeX document. The term “apa” denotes the citation style. This can be changed accordingly.
\addbibresource{example.bib}
The above command calls in the .bib file, which has the citation information for in-text citations and the bibliography.
In an article or book chapter, the command \printbibliography inserts the bibliography, which will contain citations referenced in the text. We will take a slightly different approach in adding references to a CV.
Find more information here: https://
In-text citations
| Command | Description | |
|---|---|---|
\cite{} | → | bare citation command (according to style) |
\parencite{} | → | parenthetical citation |
\citeauthor{} | → | prints author names(s) |
\textcite{} | → | prints authors or editors followed by a citation label enclosed in () |
\nocite {*} | → | prints publication in bibliography without citation |
\citeyear{} | → | prints only the year field |
Examples
| Command | Result | |
|---|---|---|
\cite{knyazeva_duplex_2013} | → | Knyazeva and Pohl 2013 |
\parencite{singh_erratum:_2013} | → | (Singh et al. 2013) |
\citeauthor{campbell_how_2011} | → | Campbell and Cabrera |
\textcite{elsabbagh_microstructure_2014} | → | Elsabbagh, Hamouda, and Taha (2014) |
Exercise
Exercise 3: Adding a Bibliography
Objective: Learn to create, edit or upload a .bib file, use basic citation commands, and display a bibliography.
Create a .bib file and add references
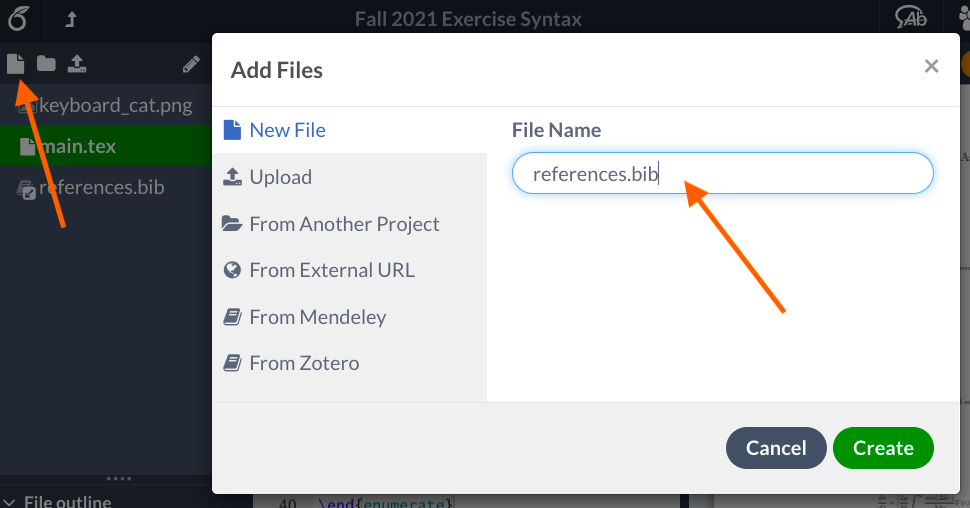
Create a new file within your Overleaf project (click on the paper icon in the upper left) and name it references.bib
Search for these three articles and books in Google Scholar and locate their BibTeX formatted citations.
10.1126/science.1214319
Hydraulic power system analysis
10.1103/PhysRevB.100.094418
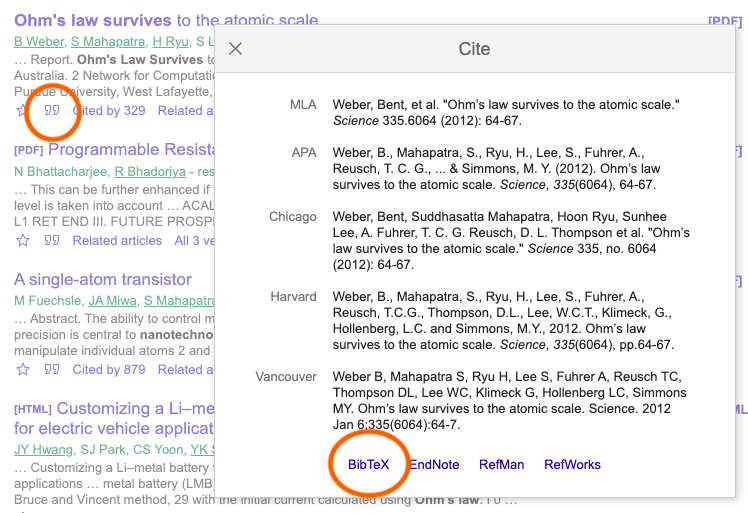
Paste each citation within your .bib file. (No preamble is needed).
Adding a bibliography
To display bibliography in APA style, add package and style command to preamble:
\usepackage[backend=biber,style=authoryear]{biblatex}
\addbibresource{references.bib}
And use these commands within document:
\printbibliography
\nocite{*}
Citation commands
Try using citation commands to recreate the sentence below:
In the example provided, Weber et al. 2012 describes the experiment, but Akers, Gassman, and Smith contradict these conclusions.
Commands needed: \cite{}, \citeauthor{}
For additional examples and more information, please visit Overleaf’s page on bibliography management in LaTeX
Figures
Uploading a figure
Incorporating images and figures into your Overleaf project is best accomplished by creating your figures, particularly graphs and plots, outside of Overleaf and then importing them into Overleaf.
Click on the “upload” icon and navigate to the location of your figure.
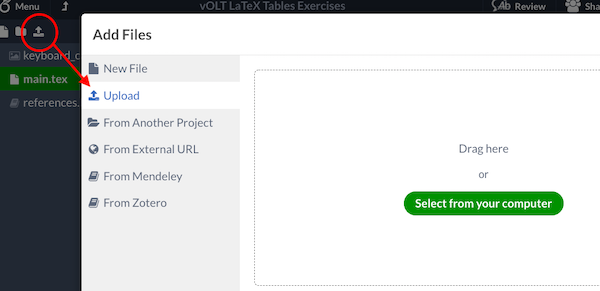
Figure Placement
Use the following specifiers to adjust the placement of your figures.
| Specifier | Permission |
|---|---|
| h | Place the float here: approximately, not exactly, at the same point it occurs in the source text |
| t | Position at the top of the page |
| b | Position at the bottom of the page |
| p | Put on a special page for floats only |
| ! | Override internal parameters LaTeX uses for determining “good” float positions |
| H | Places the float at precisely the location in the LaTeX code. Requires the float package. This is somewhat equivalent to h! |
Exercise
Exercise 4: Uploading a Figure
Objective: Learn to upload and position figures in Overleaf.
Upload a figure
To upload image, choose an image of your own, or find file at:
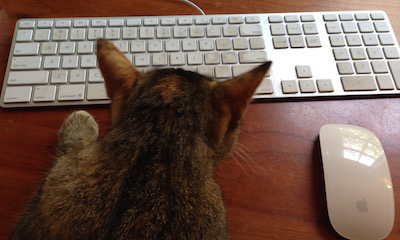
keyboard_cat.pngDownload keyboard_cat.png, and upload file to the Overleaf project.
Place image with these commands:
\usepackage{graphicx}
\includegraphics[width=0.4\textwidth]{keyboard_cat}
Designate figure position
Use b, t, h to see where figure moves. You might need to add additional text in the document to see how the figure placement varies.
\begin{figure}[b]
\centering
\includegraphics[width=0.6\textwidth]{keyboard_cat}
\end{figure}